How Do You Get Chewing Gum Off Leather Without Ruining It?
Published on: March 1, 2026 | Last Updated: March 1, 2026
Written By: Harriet Nicholson
Hello Tannery Talk. That moment you find a wad of gum stuck to your leather seat is pure panic. You can fix this without a lasting mark.
We will cover your immediate first step, why the freezer is your best friend, safe products to lift any residue, and how to restore your leather’s finish afterward.
I’ve repaired this specific issue on everything from car interiors to sofas, using methods that protect the leather’s grain and color.
What Gum Does to Your Leather
Gum is not a stain. It is a physical, sticky bond. Think of it like a temporary weld between the gum and the top layer of your leather’s grain.
When you pull on it, you aren’t just lifting off gum. You are pulling directly on the leather’s surface fibers and its dye. Yank it, and you risk tearing those tiny fibers or pulling the color right off the hide. This leaves a permanent, fuzzy spot or a pale patch that is much harder to fix than the gum itself.
Your leather’s finish changes everything. A protected, coated leather on a car seat has a plastic top layer that offers some defense. A delicate aniline leather or a nubuck sofa has no such shield; the gum bonds directly to the raw, porous surface, making removal far more sensitive.
First, Take a Breath and Assess the Situation
Do not grab the gum. Your first job is to look. Is the gum still soft and pliable, or has it hardened into a tough wad? Fresh gum is a different challenge than old, fossilized gum.
Next, identify your leather. Run your fingers over a clean area. Is it smooth and slightly glossy (like most car seats)? Is it soft, matte, and shows natural marks (aniline)? Is it velvety like suede? This tells you how aggressive you can be.
Now, gather your simple tools. You likely have everything you need:
- A few ice cubes in a sealed plastic bag.
- A soft, lint-free cloth (an old cotton t-shirt is perfect).
- A blunt plastic edge-a credit card, a butter knife’s back, or a plastic spoon.
- A gentle, pH-balanced leather cleaner.
Before anything touches the gum, you must test your cleaner on a hidden spot, like under a seat cushion or behind a skirt. Apply a dab, wait a minute, and wipe. If the color stays on your cloth or the finish changes, stop. You need a different plan. I learned this the hard way years ago on a client’s aniline chair, and it saved Scout, my wallet, from a similar fate when I spilled oil.
The Ice Method: Your Best Bet for Safe Removal
Heat is the enemy here. It makes gum gooey and pushes it deeper into the leather’s pores. Cold is your friend. It makes the gum brittle and easy to pop off. I’ve used this method on everything from Mason’s saddle straps to a friend’s car seat with perfect results.
- Grab a few ice cubes and wrap them tightly in a thin plastic bag or a soft cloth. A resealable bag works great. You want the cold, not direct moisture, on the leather.
- Hold the ice pack directly onto the chewing gum. Apply firm, steady pressure. You’re not rubbing, you’re just chilling it. Keep the ice in place for 15 to 20 minutes to fully harden the gum.
- Check if the gum is ready. It should look dull and feel solid, like a hard candy. If it’s still slightly soft or pliable, give it another 5 minutes with the ice.
- Now for removal. Take a blunt plastic edge. A credit card, a butter knife handle, or a dedicated plastic scraper works. Gently nudge the edge under a corner of the frozen gum. Use a slow, upward flicking motion to lift the gum off in pieces, avoiding any sawing or digging into the leather surface.
You’ll likely get the main blob off, but a faint, sticky shadow might remain. Don’t panic. This is normal.
- Dampen a soft, white cloth with a small amount of a pH-neutral leather cleaner. Gently blot and circle over the residue. The cleaner breaks down the sticky oils without harming the leather’s finish.
- Let the area dry completely. Then, follow up with a light application of leather conditioner. This replenishes any moisture the cleaning process might have removed and protects the spot.
For Fresh Gum on Your Couch or Car Seat
If you catch the spill while it’s still warm and pliable, you have a slight advantage. Speed is key. The goal is to remove it before it sets and bonds.
Do not press down or smear it. That just makes a bigger mess.
- If possible, gently stretch the gum upward from the leather in one stringy piece using your fingers. Pull slowly and steadily away from the surface.
- For gum that’s more flattened, go straight for the ice method. The cold will harden it quickly, often in just 5 to 10 minutes, making scraping easy.
- Acting quickly often means you can skip the cleaner step. After scraping, a simple wipe with a damp cloth and a light conditioning may be all you need.
I once got a blob of fresh gum off my own sofa arm this way. Quick action saved me a lot of fuss later.
For Dried or Old Gum
This is a common worry. I’ve worked on vintage jackets where gum was ground into a seam years ago. Old gum is set in, but the principle is the same. You just need more patience.
Hardened gum needs a longer, deeper chill to become brittle all the way through.
- Apply your ice pack as before, but plan to leave it for a full 25 to 30 minutes. Check it by trying to flex a corner with your plastic tool.
- You may not get it off in one piece. Work slowly, chipping away at the edges. If it’s not cracking, stop and chill it longer. Forcing it risks scratching the leather.
- Residue is almost guaranteed with old gum. Be prepared to use the leather cleaner step, and you might need to gently work it in with a soft-bristled brush, like a horsehair detailing brush, for tougher spots.
The leather underneath might look a bit different, like Scout’s wallet does where an old stain was lifted. A good conditioning after the cleanup will even out the look and feel, blending the cared-for spot with the rest of the leather’s patina.
Handling Tough Cases: Suede, Old Stains, and Car Interiors
Not all leather is the same. Your approach needs to shift when the material is delicate or the setting is tricky, like a car interior. Here is how to adapt the basic method for these tougher situations.
When It’s Suede or Nubuck: Skip the Ice, Grab an Eraser
Suede and nubuck have a soft, raised nap. Ice water is your enemy here. It can matte the fibers flat and leave a dark, permanent water ring. For these materials, you must use the dry freezer method followed by a specialized gum eraser. The cold makes the gum brittle, and the eraser crumbles it away without wetting the leather.
I keep a gum eraser in my kit for moments like these. On a pair of suede shoes, it saved the nap from disaster. Here is the simple process:
- Freeze the gum with an ice pack wrapped in a thin plastic bag for about 15 minutes.
- Gently flex the leather to crack the frozen gum.
- Use a clean, dry gum eraser. Rub it over the remaining bits in one direction, following the grain of the nap.
- Brush the area lightly with a suede or nubuck brush to restore the texture.
A common mistake is scrubbing too hard with the eraser. This can wear down the nap. Gentle, consistent strokes work best. If a slight shadow remains, a suede-specific cleaner applied with a soft brush can often lift it.
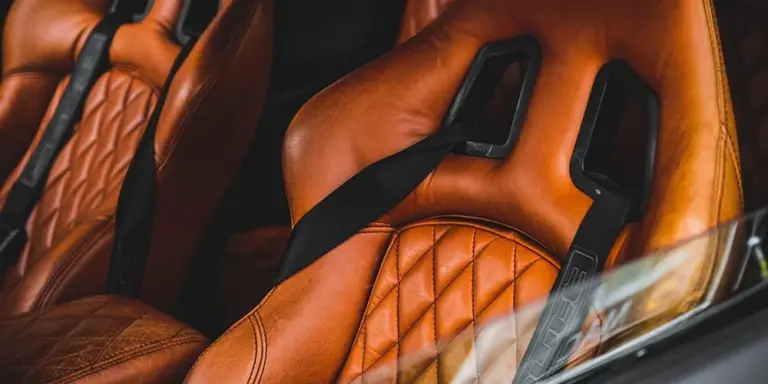
Car Seats and Stubborn Residue: The Cleaner Method
Car leather seats often have a protective coating. After you pick off the frozen gum, you might find a sticky film or a slight stain left behind. This is when a dedicated, leather-safe cleaner becomes your best tool for a spotless finish. You never want to scrub aggressively, as that can dull the coated surface.
For the stubborn residue I have seen on car seats, this two step process works reliably:
- Dampen a soft, white cloth with a neutral, pH balanced leather cleaner. Do not soak it.
- Gently dab and circle the stained area. Let the cleaner sit for no more than a minute to break down the residue.
- Wipe it away with a clean, dry part of the cloth. You should see the stickiness lift.
Car interiors face sun and heat, which can dry leather out. After cleaning, I always follow up with a light, non greasy conditioner. This keeps the seat supple and prevents the cleaned spot from becoming a dry patch later. This is how I prevent and protect my leather car seats from cracking and drying out.
After the Gum Is Gone: Dealing with Fades and Marks
Sometimes, the spot where the gum was looks a little lighter or has a faint mark. Do not panic. This is often just a need for moisture and color blending. A quality leather conditioner will nourish the fibers and help even out minor color differences. Think of it like moisturizing skin after a scab falls off.
I did this on June, my leather jacket, after removing a sticky substance. The spot was pale, but conditioning blended it right in. Here is how to do it:
- Choose a pH balanced leather conditioner or balm.
- Apply a small dab to a clean cloth and rub it into the affected area using small circles.
- Let it absorb fully, which usually takes a few hours. Buff lightly with a dry cloth if any residue remains.
If the color loss is more noticeable, a pigmented leather balm that matches your item can help. Always test any colored product in a hidden area first, like under a seat cushion. The goal is to restore the leather’s handfeel and appearance, not to mask it with a new coat of paint. For a faded, worn leather sofa, you might explore a proper restore and refinishing approach. When done carefully, it can restore color and texture without masking wear.
Big Mistakes to Avoid When Getting Gum Off Leather
When gum gets stuck, panic sets in. You might grab the first thing you’ve heard works on a t-shirt or carpet. On leather, those quick fixes can cause a permanent problem worse than the gum itself. Leather is a skin, not a fabric, and treating it like one is the fastest way to ruin its finish and structure.
Why Fabric Tricks Fail on Leather
Many popular gum-removal methods for clothes use heat or oils. Both are bad news for your couch or car seat.
- Heat (Hairdryers, Irons, Hot Water): Intense heat bakes the gum deeper into the leather’s pores. It can also cause the leather’s natural oils to migrate and evaporate from the surface, leaving behind a stiff, brittle patch. I’ve seen a beautiful chair with a permanent, shiny heat-scar from someone trying to iron gum away.
- Peanut Butter, Cooking Oils, or Mayo: The oils in these foods will absolutely break down gum. They will also create a deep, greasy stain in your leather that is incredibly difficult to remove. Leather absorbs fats. What starts as a gum spot becomes a dark, oily blotch.
- Vinegar or Rubbing Alcohol: These are harsh, drying solvents. They strip the protective top-coat and the leather’s natural moisturizers. You’ll be left with a patch that looks faded, feels like cardboard, and is prone to cracking.
The Right Way to Think About Tools
Your instinct might be to pick or scrape the gum off. Fight that instinct.
Never use a knife, metal scraper, or your fingernails to pick at gum. You will scratch the surface. On smooth leather, that’s a permanent gouge. On a grained leather car seat, you’ll tear the peaks of the grain. Think of it like using a metal pick on sunburned skin.
Excessive rubbing is another silent killer. Rubbing hard with a cloth, especially after applying a cleaner, creates friction heat and abrasion. You’ll wear away the color and finish, leaving a obvious “cleaned” spot that’s duller than the rest. My jacket, June, has a small area where a previous owner scrubbed too hard; the color is just a shade lighter there forever.
The goal is to gently *lift* and *roll* the gum away, not attack it. Patience and the right, gentle tool-like a blunt plastic card-protect your leather’s future.
After the Gum is Gone: Cleaning and Restoring the Spot

You got the gum off. Take a breath. The hard part is over, but what you do next is what makes the difference between a forgotten mishap and a permanent mark. This is about gentle care and bringing the leather back to life.
Gently Clean the Area
First, look at the spot. You’ll likely see a faint, sticky residue or some crumbs from the gum or your cleaning tools. Your goal now is to tidy up without soaking the leather.
- Fold a clean, soft cotton cloth (like an old t-shirt) and lightly dampen a small corner with cool, distilled water. Wring it out completely. It should feel barely damp to your touch.
- Gently dab and wipe the affected area in a circular motion. You are not scrubbing, you are just lifting away the last bits of debris and any cleaner you used earlier.
- Immediately follow with a dry part of the cloth to blot away any moisture.
Think of it like wiping a smudge off June’s jacket cuff-a light touch is key. A common mistake is using too much water, which can drive dirt deeper or leave a water ring. If the cloth gets dirty, switch to a fresh, dry section.
Apply a Leather Conditioner
This step is non-negotiable. The process of freezing or using a cleaner to remove gum also strips away the leather’s natural oils. If you skip conditioning, that spot can become dry, stiff, and more prone to cracking over time.
Leather is skin. After a deep clean, it needs moisture.
- Use a small amount of a pH-balanced leather conditioner or cream. A neutral product made for automotive or furniture leather is a safe choice.
- Apply a dime-sized amount to another clean, soft cloth.
- Rub the conditioner into the spot using small, even circles. Then, gently feather it out into the surrounding leather to help it blend. You don’t need to condition the entire seat or sofa, just the immediate area.
Conditioning replenishes the oils you removed, ensuring the leather stays supple and the color remains even. I always do this for Scout, my wallet, after any deep clean-it keeps the handfeel soft and prevents premature aging.
Let It Dry and Check the Blend
Now, patience. Proper drying lets the conditioner soak in and do its job.
- Leave the piece alone in a well-ventilated, room-temperature space. Avoid direct heat or sunlight, like placing it near a heater or in a hot car.
- Drying can take a few hours. For a thick couch cushion, it might take overnight.
- Once dry to the touch, do the look and feel test. Run your fingers over the spot. It should feel as soft and smooth as the surrounding leather. Look at it from different angles in good light. The color and sheen should match.
If the spot feels a bit stiff or looks dull, you can apply one more very light coat of conditioner. Letting the leather dry fully is the final step to ensuring your repair is seamless and durable. Just like with Mason’s saddle after a conditioning, the true, rich color comes back once everything has settled.
How to Keep Gum Away from Your Leather for Good
The best fix is the one you never have to make. A little planning saves you from the stress of a sticky cleanup later.
Simple Rules for Your Space
Clear boundaries work. In our home, gum stays at the kitchen table. It’s an easy, hard-surface zone for cleanup. For your car, the rule is simple: no unwrapping gum while driving. A moment of distraction is all it takes.
Talk with your family, especially kids, about where gum is allowed. It’s not about being strict, it’s about protecting the things you’ve invested in, like your couch or car seats.
Creating a designated ‘gum zone’ on non-leather surfaces prevents most accidents before they start.
Use a Disposal System
Have a plan for the chewed gum. A small piece of wax paper or a napkin isn’t reliable. It gets lost, and the gum finds its way onto a surface.
I keep a tiny tin in my car’s cup holder just for this. In the house, a small jar with a lid on the counter works perfectly. Make it obvious and easy.
- For the car: A mint tin or a very small container in a cup holder.
- For the home: A jar with a lid near where people usually have gum.
This gives everyone a clear and simple next step. No one has to go looking for a trash can.
Conditioning is Your Secret Weapon
Think of leather conditioner like a shield. A well-conditioned piece has its pores filled with nourishing oils and waxes. This creates a smoother, more resilient surface, especially compared to untreated leather.
Sticky substances have a harder time gripping onto a conditioned hide. If gum does land on it, it often sits more on the surface, making the removal steps we discussed earlier much easier and safer.
Regular conditioning doesn’t just prevent drying and cracking, it creates a surface that’s more resistant to spills and stickiness.
My old saddle, Mason, gets conditioned every few months. That deep chestnut hide has repelled everything from tree sap to spilled drinks because the finish is so well-maintained. A conditioned surface gives you precious extra time to react before a substance soaks in.
Use a pH-balanced leather conditioner every 3 to 6 months, depending on use. Apply it with a soft cloth, buff it in thoroughly, and let it absorb. This simple habit is the best long-term defense you have.
Quick Answers
Can I use a hair dryer to soften the gum first?
No. Heat will melt the gum and drive it deeper into the leather’s pores, creating a worse bond and risking a heat-damaged finish. Always use cold to harden and brittle the gum for safe removal.
What if I don’t have a dedicated leather cleaner for the residue?
A barely damp cloth with distilled water can lift fresh residue in a pinch, but follow it immediately with a dry blot. For guaranteed safety and to nourish the leather, use a proper pH-balanced conditioner afterward.
My leather is suede. Is the ice method still safe?
Do not use an ice pack directly on suede or nubuck, as moisture will ruin the nap. Use the dry freezer method, then carefully crumble the frozen gum away with a specialized gum eraser, brushing the nap afterward.
How often should I condition my leather to protect it from sticky messes?
Condition high-use items like car seats or sofas every 3-4 months. A well-nourished, conditioned surface has filled pores, making it more resistant to substances bonding and easier to clean if an accident occurs. For leather couches, regular conditioning helps prevent cracks and wear. Proper care now can extend their lifespan.
Final Thoughts on Gum Removal
When chewing gum sticks to your leather, cold is your friend. Freezing it makes the gum brittle and easy to scrape away, protecting the delicate finish of your seat or sofa.
Good care is a responsible practice. Treating stains properly and conditioning your leather afterward extends its life for years, honoring the material and your investment in it. This naturally leads to exploring the best general methods for caring for leather items. Knowing these methods helps you apply the right care consistently.
References & External Links
- r/CleaningTips on Reddit: Chewing gum on leather wallet… Any advice is much appreciated
- How to Remove Gum from Leather: A Comprehensive Guide
- How to Remove Gum from Leather Furniture Without Damage | Leather Help
- cleaning – How do I remove the chewing gum stuck in my shoe? – Lifehacks Stack Exchange
Harriet is a avid collector of leather goods such as purses, bags, seat covers, etc and has an extensive background in leather care, recovery, stain removal and restoration. She has worked for a number of years perfecting her leather care techniques and knows the ins and outs of restoring all kinds and types of leather products. With her first hand knowledge in leather care, you can not go wrong listening to her advice.
Car Interior and Auto Leather Care